Bleeding Brain Cupcakes
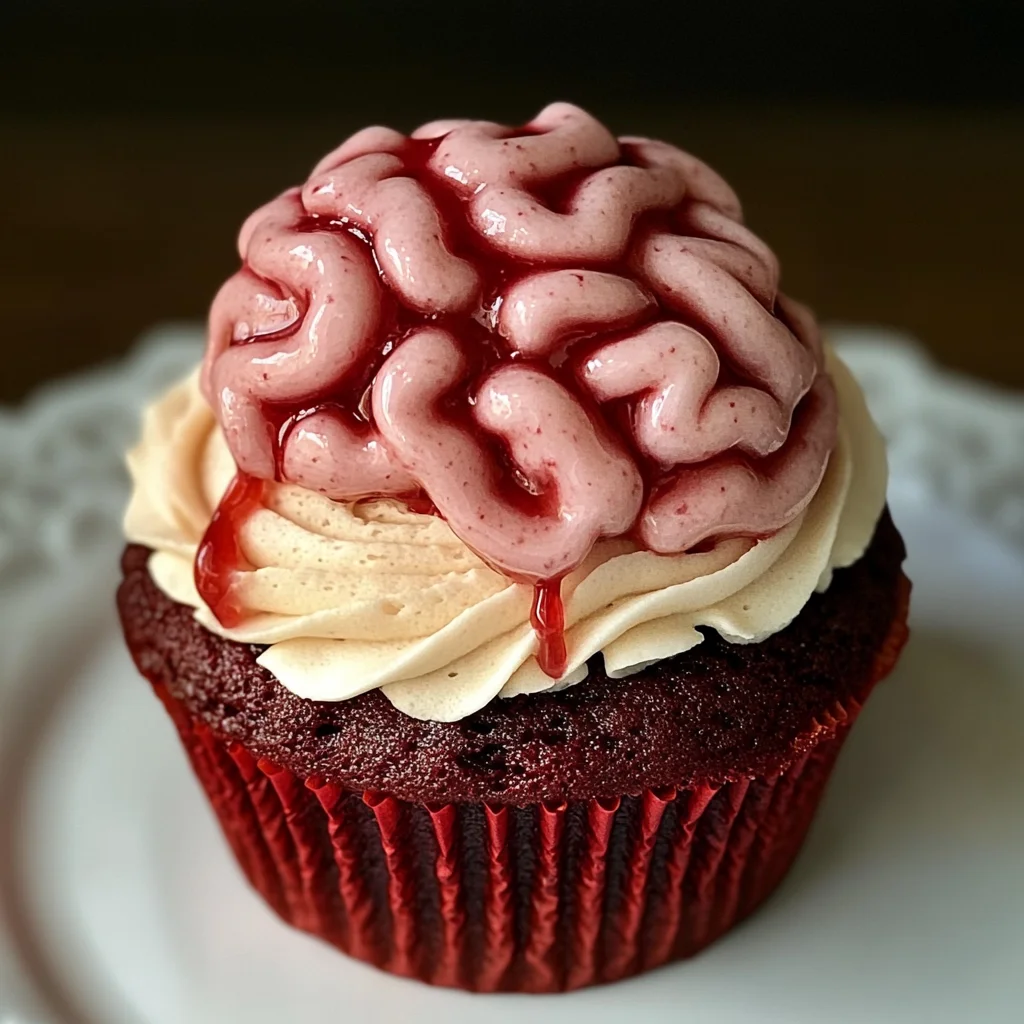
Bleeding Brain Cupcakes are the perfect spooky treat for Halloween! These delightful red velvet cupcakes are filled with sweet jam and topped with pink icing designed to look like brains. They stand out at any Halloween gathering, making them a fun and creative dessert option. Whether it’s for a party, a themed dinner, or just a fun baking project, these cupcakes are sure to impress!
Why You’ll Love This Recipe
- Spooky Appeal: The brain-themed icing adds a playful yet creepy touch, ideal for Halloween festivities.
- Deliciously Moist: The combination of buttermilk and butter ensures these cupcakes are rich and moist.
- Fill Your Own: The jam filling creates a delightful surprise in every bite, enhancing the overall flavor.
- Easy to Make: With straightforward steps and common ingredients, baking these cupcakes is simple even for beginners.
- Versatile Decoration: Feel free to customize the icing colors or toppings for different occasions beyond Halloween!
Tools and Preparation
Before you begin making your Bleeding Brain Cupcakes, gather your tools to ensure a smooth baking process.
Essential Tools and Equipment
- Electric mixer
- Mixing bowls
- Measuring scales
- Cupcake tin
- Cupcake cases
- Piping bags
- Circular nozzle
Importance of Each Tool
- Electric mixer: Saves time and effort when whisking butter and sugar together until fluffy.
- Cupcake tin: Ensures even baking of the cupcakes while providing the perfect shape.
- Piping bags: Allows for precise decorating of the buttercream icing, giving a professional finish.
Ingredients
Red velvet cupcake, filled with jam, topped with brain themed pink icing – perfect for Halloween!
Ingredients:
– 150 g Butter or baking spread (softened, unsalted)
– 150 g Caster sugar
– 2 Eggs (large)
– 1 tsp Vanilla extract
– 85 ml Buttermilk
– 165 g Self-raising flour
– 1 1/2 tbsp Cocoa powder
– 1/2 tsp Bicarbonate of soda
– 1 tsp Red food colouring (I use Pro Gel or Sugarflair)
– 200 g Strawberry or Raspberry Jam
– 200 g Butter (unsalted, softened)
– 400 g Icing sugar
– 1 tsp Vanilla extract
– 2 tbsp Milk
– Pink food colouring (I use Pro Gel or Sugarflair)
How to Make Bleeding Brain Cupcakes
Step 1: Preheat the Oven
Preheat your oven to 160C Fan/180C/350F/Gas Mark 4. Line a cupcake tin with black cupcake cases to set the spooky mood.
Step 2: Cream Butter and Sugar
In a mixing bowl, whisk the softened butter and caster sugar together until fluffy. An electric mixer with a paddle attachment works best.
Step 3: Add Eggs and Vanilla
Add the large eggs one at a time along with the vanilla extract. Mix them in thoroughly until well combined.
Step 4: Combine Wet and Dry Ingredients
Add buttermilk, cocoa powder, bicarbonate of soda, red food colouring, and self-raising flour into the bowl. Mix everything until just combined—do not overmix.
Step 5: Fill Cupcake Cases
Divide the batter evenly between the lined cupcake cases. Fill them about two-thirds full to allow room for rising.
Step 6: Bake the Cupcakes
Bake in your preheated oven for about 20–25 minutes. Check doneness by inserting a skewer into the center; it should come out clean.
Step 7: Cool the Cupcakes
Once baked, transfer the cupcakes to a cooling rack and let them cool completely before filling.
Step 8: Fill with Jam
Using either a cupcake corer or a knife, make holes in the center of each cooled cupcake. Fill each hole generously with strawberry or raspberry jam using a small spoon or piping bag.
Step 9: Prepare Buttercream Icing
In another bowl, mix softened unsalted butter on its own for about two minutes until creamy. Gradually add icing sugar, milk, vanilla extract, and just enough pink food coloring for a pale shade.
Step 10: Pipe Decoration
Transfer the pink buttercream into a piping bag fitted with a round nozzle. Pipe lines down the center of each cupcake followed by squiggles on either side for that brain effect.
Step 11: Store Your Treats
Keep your Bleeding Brain Cupcakes in an airtight container in a cool place. Enjoy them within three days for optimal freshness!
How to Serve Bleeding Brain Cupcakes
These fun and spooky Bleeding Brain Cupcakes are perfect for Halloween gatherings or themed parties. Here are some creative serving suggestions to elevate your cupcake experience.
Creative Platter Ideas
- Gory Display: Arrange the cupcakes on a platter surrounded by fake spiders and cobwebs for a spooky effect.
- Cupcake Tower: Stack the cupcakes on a tiered stand for an impressive centerpiece that draws attention.
Pair with Beverages
- Fruit Punch: Serve alongside a red fruit punch to complement the color theme and add a refreshing drink option.
- Spiced Apple Cider: Warm spiced apple cider pairs well with the sweetness of the cupcakes, offering a cozy touch.
Themed Decorations
- Halloween-themed Plates: Use plates with Halloween motifs to enhance the atmosphere during your gathering.
- Mini Flags: Decorate each cupcake with mini flags featuring Halloween characters for an extra festive look.
How to Perfect Bleeding Brain Cupcakes
Perfecting these cupcakes involves attention to detail and some handy tips. Follow these suggestions for the best results.
- Bold Butter Mixing: Whip the butter until light and fluffy before adding other ingredients for airy cupcakes.
- Precise Color Mixing: Start with a small amount of red food coloring. Gradually add more until you achieve your desired shade without overdoing it.
- Cool Completely: Allow the cupcakes to cool completely before filling them with jam; this prevents melting and helps maintain their shape.
- Pipe with Care: When piping the buttercream, use even pressure to create uniform squiggles that resemble brains.
- Store Properly: Keep leftovers in an airtight container at room temperature, consuming them within three days for freshness.
Best Side Dishes for Bleeding Brain Cupcakes
To make your Halloween spread even more delightful, consider these side dishes that pair well with Bleeding Brain Cupcakes.
- Creepy Cheese Platter: A selection of cheeses, crackers, and fruit arranged artfully to entice guests.
- Deviled Eyeballs: Deviled eggs decorated with olives or cherry tomatoes to look like spooky eyeballs.
- Witch’s Brew Soup: A vibrant green soup made from spinach or peas served in small cups for easy sipping.
- Monster Veggie Tray: An assortment of colorful vegetables arranged to resemble monsters, served with a tasty dip.
- Ghostly Marshmallow Treats: Marshmallows dipped in chocolate and decorated as ghosts for a sweet treat.
- Zombie Fingers Hot Dogs: Hot dogs cut into finger shapes and served with ketchup for a fun twist on finger foods.
- Pumpkin Patch Salad: A mixed greens salad topped with pumpkin seeds and orange bell peppers for a seasonal touch.
- Spooky Popcorn Mix: A blend of popcorn, candy corn, and chocolate pieces for a crunchy snack that’s hard to resist.
Common Mistakes to Avoid
When making Bleeding Brain Cupcakes, there are a few common pitfalls to watch out for. Here’s how to ensure your cupcakes turn out perfectly.
- Bold mixing technique: Overmixing the batter can lead to dense cupcakes. Mix just until combined for a light texture.
- Bold measuring flour: Using too much flour can make the cupcakes dry. Always spoon flour into your measuring cup and level it off with a knife.
- Bold not cooling: Filling cupcakes with jam before they cool can cause it to melt and seep out. Allow them to cool completely first.
- Bold icing consistency: If the buttercream is too stiff, it won’t pipe well. Adjust with more milk gradually until you reach a smooth texture.
- Bold food coloring caution: Adding too much red food coloring can overpower the cake. Start with a small amount and add more as needed for desired color.

Storage & Reheating Instructions
Refrigerator Storage
- Store in an airtight container for up to 3 days.
- Keep in a cool place away from direct sunlight.
Freezing Bleeding Brain Cupcakes
- Freeze unfilled cupcakes for up to 3 months.
- Wrap each cupcake tightly in plastic wrap and place in a freezer-safe bag.
Reheating Bleeding Brain Cupcakes
- Oven: Preheat your oven to 160C (320F) and warm cupcakes for about 10 minutes.
- Microwave: Heat on medium power for about 15-20 seconds per cupcake.
- Stovetop: Place on a plate covered with foil over low heat for a few minutes until warm.
Frequently Asked Questions
Here are some frequently asked questions regarding Bleeding Brain Cupcakes.
What is the best way to fill Bleeding Brain Cupcakes?
You can use either a cupcake corer or a knife to create a hole in the center of each cupcake, then fill it with your choice of jam using a spoon or piping bag.
Can I use other flavors of jam?
Absolutely! While strawberry and raspberry jams work well, feel free to experiment with different flavors like blueberry or cherry to suit your taste.
How do I achieve the perfect brain icing effect?
To create the brain effect, pipe a line down the center of each cupcake and then add squiggles on either side using buttercream icing.
Can I make these cupcakes ahead of time?
Yes! You can bake and fill them one day in advance. Just store them properly in an airtight container until ready to serve.
Are Bleeding Brain Cupcakes suitable for other occasions?
Definitely! These creative cupcakes are perfect for Halloween but can also be modified for birthdays or themed parties by changing the colors and decorations.
Final Thoughts
Bleeding Brain Cupcakes are not just visually appealing; they’re deliciously moist and filled with fruity goodness. You can customize the flavors and colors to fit any occasion, making them versatile enough for various events. Try this fun recipe, and let your creativity shine!
Bleeding Brain Cupcakes
Bleeding Brain Cupcakes are the ultimate spooky delight for any Halloween celebration! These moist red velvet cupcakes are filled with luscious strawberry or raspberry jam, creating a delicious surprise in every bite. Topped with playful pink icing that mimics brain squiggles, they not only taste great but also add a fun and eerie touch to your dessert table. Perfect for parties or themed gatherings, these cupcakes are easy to make and can be customized for any occasion.
- Prep Time: 20 minutes
- Cook Time: 25 minutes
- Total Time: 45 minutes
- Yield: Approximately 12 servings 1x
- Category: Dessert
- Method: Baking
- Cuisine: American
Ingredients
- 150 g Butter or baking spread (softened, unsalted)
- 150 g Caster sugar
- 2 Eggs (large)
- 1 tsp Vanilla extract
- 85 ml Buttermilk
- 165 g Self-raising flour
- 1 1/2 tbsp Cocoa powder
- 1/2 tsp Bicarbonate of soda
- 1 tsp Red food colouring
- 200 g Strawberry or Raspberry Jam
- 200 g Unsalted Butter (softened)
- 400 g Icing sugar
- 1 tsp Vanilla extract
- 2 tbsp Milk
- Pink food colouring
Instructions
- Preheat the oven to 160C (fan) / 180C / 350F / Gas Mark 4 and line a cupcake tin with black cases.
- Cream softened butter and caster sugar together until fluffy.
- Add eggs one at a time along with vanilla extract; mix well.
- Gradually add buttermilk, cocoa powder, bicarbonate of soda, red food coloring, and self-raising flour until just combined.
- Fill cupcake cases two-thirds full and bake for 20–25 minutes until a skewer comes out clean.
- Cool completely before making holes in the center of each cupcake and filling with jam.
- Prepare pink buttercream icing by mixing softened butter, icing sugar, milk, vanilla extract, and pink food coloring until smooth.
- Pipe the icing onto the cupcakes to create a brain effect.
Nutrition
- Serving Size: 1 cupcake (80g)
- Calories: 360
- Sugar: 30g
- Sodium: 180mg
- Fat: 18g
- Saturated Fat: 10g
- Unsaturated Fat: 7g
- Trans Fat: 0g
- Carbohydrates: 46g
- Fiber: 1g
- Protein: 3g
- Cholesterol: 55mg