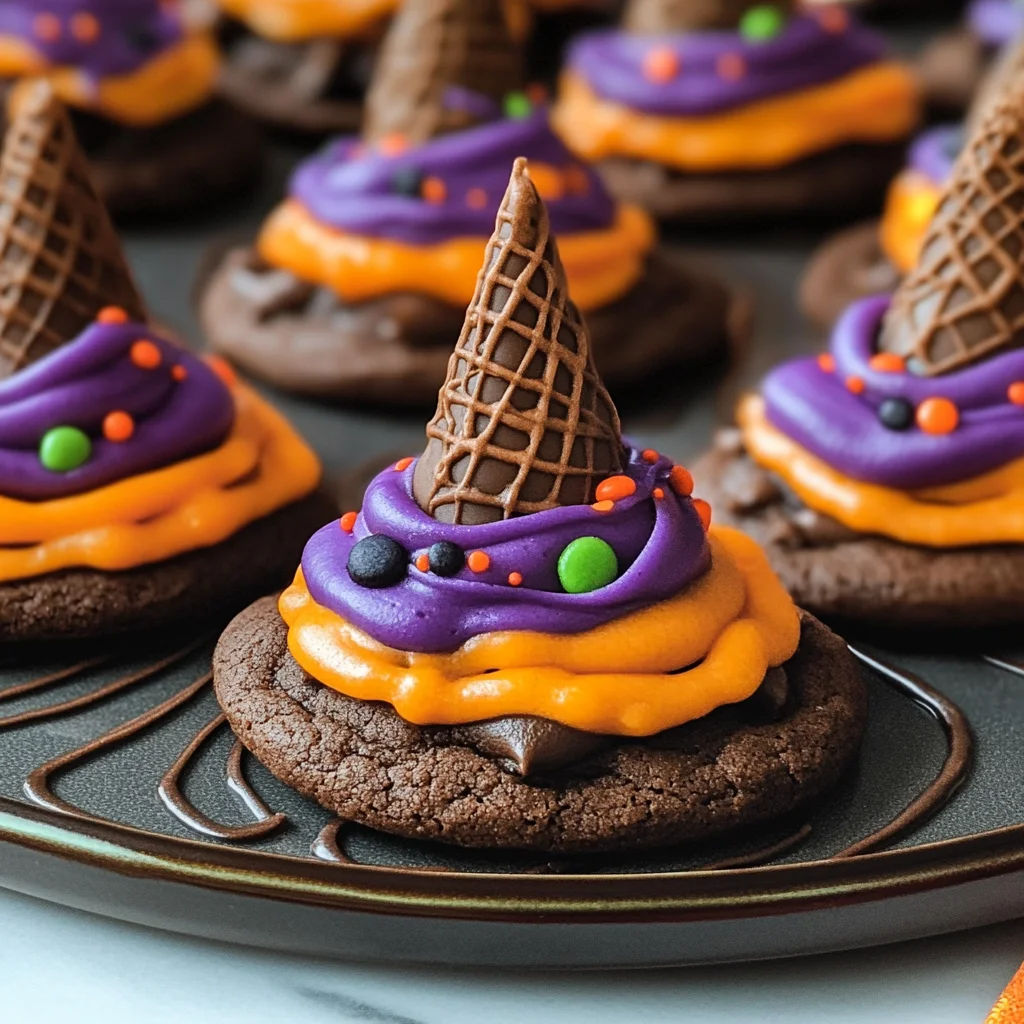
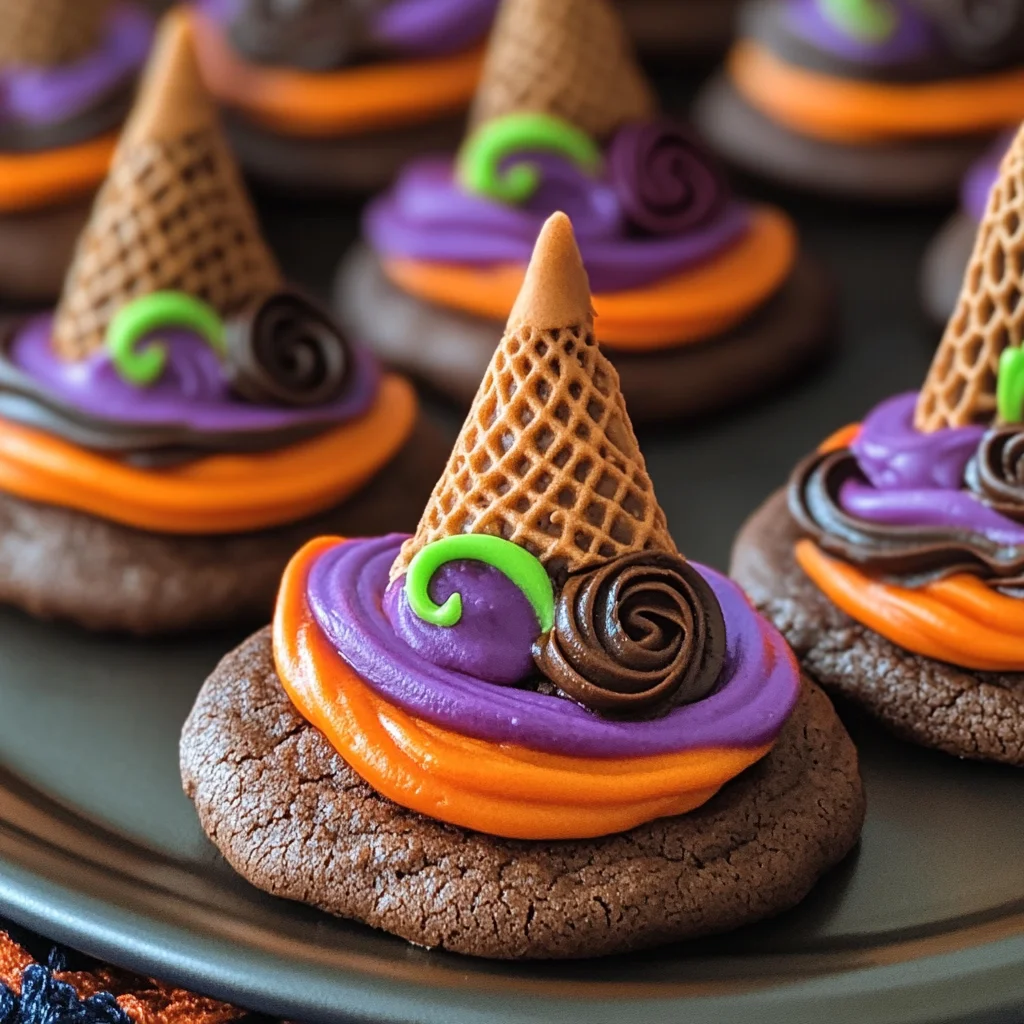
Halloween Witch Hat Cookies
These Halloween Witch Hat Cookies are a delightful treat that will enchant your Halloween party guests. With their fun and spooky design, these cookies are perfect for family gatherings, school parties, or any festive occasion. Not only are they easy to make, but they also allow for creativity in decoration, making them a favorite among kids and adults alike.
Why You’ll Love This Recipe
- Fun to Make: This recipe is a fantastic way to get the kids involved in the kitchen. They can help decorate and assemble the cookies.
- Customizable Designs: The cookie hats can be decorated in various colors and patterns, allowing everyone to create their unique masterpiece.
- Tasty Treats: With a delicious blend of chocolate cookies and creamy icing, these treats are sure to satisfy any sweet tooth.
- Perfect for Parties: These cookies not only look great on a platter but also make for a fun conversation starter at any Halloween gathering.
- Easy to Follow Instructions: The step-by-step guide makes it simple for bakers of all skill levels to create these whimsical cookies.
Tools and Preparation
To make your baking experience smooth and enjoyable, gather the following essential tools before you begin.
Essential Tools and Equipment
- Cookie sheet
- Cupcake Cones Baking Rack
- Parchment paper
- Decorating bags with piping tips
- Knife
Importance of Each Tool
- Cookie sheet: Provides an even baking surface and allows you to bake multiple cookies at once, saving time.
- Piping bags: Perfect for decorating with precision. Different tips allow for various designs, enhancing the visual appeal of your Halloween Witch Hat Cookies.
Ingredients
To prepare your Halloween Witch Hat Cookies, gather the following ingredients:
For the Cookie Base
- Favorite Cake Mix or Try Wilton’s Chocolate Cake Recipe
- Store Bought Chocolate Cookies or Try This Recipe from Wilton
For the Icing and Decoration
- Lemon Yellow Icing Color
- Black Color Mist Food Coloring Spray
- Rose Icing Colors Pink Food Coloring
- Violet Icing Color, Gel Food Coloring
- Golden Yellow Icing Color
- Orange Icing Color
For Assembly
- Sugar Cones
- Creamy White Decorator Icing, 4 lb. Tub
How to Make Halloween Witch Hat Cookies
Step 1: Prepare & Bake the Cones
- Prepare the cake mix according to your chosen recipe’s instructions.
- Place the Cupcake Cones Baking Rack on a cookie sheet.
- Insert sugar cones into the rack.
- Fill each cone with 2 tablespoons of cake batter.
- Bake and cool the cones following the timing instructions of your recipe.
Step 2: Spray the Cones
- If necessary, trim any risen cake at the top of each cone with a knife.
- Place cones wide side down on parchment paper.
- Spray the cones with Black Color Mist until fully coated.
- Let them dry for about 10 to 15 minutes.
Step 3: Tint the Icing & Prepare the Bags
- Tint 1 cup of creamy white decorator icing orange by adding orange food coloring.
- Tint another cup purple by mixing violet and rose icing colors together.
- Prepare two decorating bags with tip 2B; fill them separately with orange and purple tinted icing.
- Simultaneously tint ¼ cup of creamy white decorator icing yellow using golden yellow and lemon yellow icing colors; place it in a bag with tip 3 attached.
Step 4: Assemble the Witch Hats
- Using orange icing, pipe a small amount in the center of a cookie and place a cone on top.
- Pipe a band around half of the wide ends of cones using orange icing; smooth with a spatula.
- Repeat this process with purple icing on the remaining cookies and cones.
- Allow them to set for about 15 to 20 minutes.
- Finally, use yellow tinted icing with tip 3 attached to pipe a buckle around each hat’s band.
- Let set for another 15 to 20 minutes before serving.
Enjoy your spooky creations!
How to Serve Halloween Witch Hat Cookies
These Halloween Witch Hat Cookies are a delightful treat that can be served in various fun ways. Whether at a spooky gathering or a festive family night, here are some creative serving suggestions.
Individual Treat Bags
- Create small treat bags filled with one or two cookies for guests to take home. This adds a personal touch and makes for a great party favor.
Spooky Dessert Platter
- Arrange the cookies on a themed platter along with other Halloween treats like gummy worms and candy corn. This visually appealing setup enhances the festive atmosphere.
Pair with Hot Cocoa
- Serve the cookies alongside steaming cups of hot cocoa. The chocolatey flavors complement each other perfectly, making for a cozy treat.
Halloween-Themed Cake Stand
- Display your witch hat cookies on a decorative cake stand decorated with spider webs and plastic spiders. This elevates the presentation and draws attention to your delicious creations.
Trick-or-Treating Goodies
- Include these cookies in trick-or-treat bags for kids. They will love the fun design, and it’s a unique alternative to traditional candies.
How to Perfect Halloween Witch Hat Cookies
To ensure your Halloween Witch Hat Cookies turn out perfectly every time, follow these helpful tips.
- Use Quality Ingredients: Choose high-quality cake mix and icing colors for the best flavor and appearance.
- Chill the Icing: If your icing is too runny, refrigerate it for a few minutes before piping to achieve better control.
- Pipe Steady Pressure: When decorating, maintain steady pressure on the piping bag for consistent icing application.
- Experiment with Colors: Feel free to mix different shades of icing colors to create unique variations of witch hats.
- Allow Proper Drying Time: Don’t rush the drying process; letting the icing set fully will prevent smudging when stacking or serving.
Best Side Dishes for Halloween Witch Hat Cookies
Pairing side dishes with your Halloween Witch Hat Cookies can enhance your dessert spread. Here are some great ideas that will complement your spooky treats well.
- Pumpkin Soup: A warm, creamy soup that brings autumn flavors to your table. Serve it in small bowls for an inviting presentation.
- Ghostly Cheese Platter: An assortment of cheeses arranged with ghost-shaped crackers creates a playful contrast to sweet cookies.
- Apple Slices with Caramel Dip: Fresh apple slices paired with caramel sauce offer a crunchy and sweet side option that balances the richness of cookies.
- Mummy Dogs: Hot dogs wrapped in crescent roll dough baked until golden brown resemble little mummies—a fun savory option.
- Vegetable Skeletons: Arrange colorful veggies like carrots, cucumbers, and bell peppers into skeleton shapes served with hummus as dip.
- Monster Fruit Salad: A mix of seasonal fruits cut into spooky shapes adds freshness and color to your dessert table.
- Spiced Nuts Mix: A bowl of spiced nuts provides a crunchy snack that contrasts nicely with the soft texture of the cookies.
- Candy Corn Jello Cups: Layered jello cups mimicking candy corn colors make an eye-catching side dish that’s sure to delight guests.
Common Mistakes to Avoid
Making Halloween Witch Hat Cookies can be a fun and rewarding experience, but it’s essential to avoid common pitfalls.
- Boldly skip the chilling – Failing to chill your icing can lead to runny designs. Always chill your icing for at least 15 minutes before piping.
- Boldly ignore baking times – Overbaking can dry out your cookies. Keep an eye on the timer and check for doneness a few minutes early.
- Boldly rush the assembly – Assembling the cookies too quickly can ruin the structure. Allow each layer to set before stacking or decorating.
- Boldly forget about color mixing – Not mixing food coloring properly can result in uneven shades. Take your time to blend colors thoroughly for a vibrant look.
- Boldly use stale ingredients – Using old cake mix or icing will compromise flavor. Always check expiration dates and use fresh ingredients for the best results.
Storage & Reheating Instructions
Refrigerator Storage
- Store Halloween Witch Hat Cookies in an airtight container.
- They can be kept in the refrigerator for up to 5 days.
Freezing Halloween Witch Hat Cookies
- Freeze cookies individually wrapped in plastic wrap, then place them in a freezer-safe container.
- They can last up to 3 months in the freezer.
Reheating Halloween Witch Hat Cookies
- Oven – Preheat to 350°F (175°C), place cookies on a baking sheet for about 5-7 minutes until warmed through.
- Microwave – Heat cookies one at a time on high for about 10-15 seconds for a quick warm-up.
- Stovetop – Use a pan over low heat; cover with a lid for about 2-3 minutes for gentle warming.
Frequently Asked Questions
If you have questions about making Halloween Witch Hat Cookies, you’re not alone! Here are some common inquiries.
Can I use store-bought cookies for Halloween Witch Hat Cookies?
Yes, using store-bought chocolate cookies is a great time-saver! Just make sure they have a sturdy base for assembling the hats.
How should I store leftover Halloween Witch Hat Cookies?
Store any leftovers in an airtight container in the refrigerator for up to 5 days or freeze them for longer storage.
What decorations can I use besides icing?
Feel free to add sprinkles, edible glitter, or mini candy pieces to enhance your Halloween Witch Hat Cookies’ appearance and taste!
How can I customize my Halloween Witch Hat Cookies?
You can customize your cookies by using different colored icings, adding themed sprinkles, or trying various cookie flavors!
Final Thoughts
Halloween Witch Hat Cookies are not only delicious but also visually stunning treats that will delight both kids and adults alike. With endless customization options available, you can create unique designs that fit your Halloween theme perfectly. Don’t hesitate to try this fun project with family and friends!
Halloween Witch Hat Cookies

Halloween Witch Hat Cookies are a whimsical and delicious treat that will charm your guests this spooky season. Perfect for Halloween parties, family gatherings, or school events, these cookies combine chocolatey goodness with creative decoration. The fun design allows kids and adults alike to unleash their creativity in the kitchen, making it an enjoyable baking project for everyone. With easy-to-follow instructions and customizable designs, these cookies are sure to be a hit at any festive occasion.
- Prep Time: 30 minutes
- Cook Time: 20 minutes
- Total Time: 50 minutes
- Yield: Approximately 12 servings
- Category: Dessert
- Method: Baking
- Cuisine: American
Ingredients
- Chocolate cake mix or store-bought chocolate cookies
- Sugar cones
- Creamy white decorator icing
- Food coloring (orange, purple, yellow)
Instructions
- Preheat the oven and prepare the cake mix according to package instructions. Fill sugar cones with cake batter and bake until done.
- Once cooled, spray the cones with black color mist until fully coated and let dry.
- Tint the creamy white decorator icing with orange, purple, and yellow food colors.
- Assemble by piping icing on cookies and attaching the decorated cones as hats. Add finishing touches like buckles using the yellow icing.
- Allow the cookies to set before serving.
Nutrition
- Serving Size: 1 serving
- Calories: 210
- Sugar: 18g
- Sodium: 150mg
- Fat: 9g
- Saturated Fat: 4g
- Unsaturated Fat: 4g
- Trans Fat: 0g
- Carbohydrates: 30g
- Fiber: 1g
- Protein: 2g
- Cholesterol: 10mg