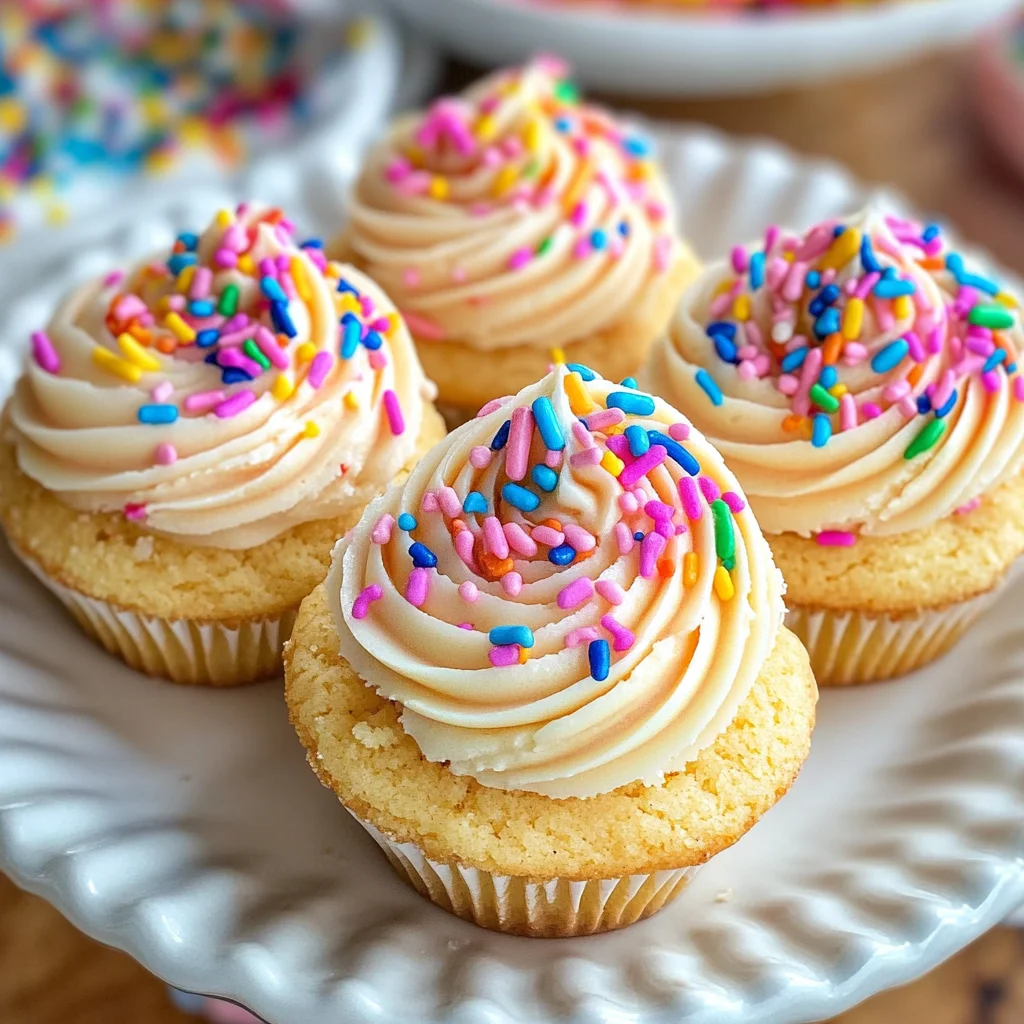
Sugar Cookie Cups
Sugar Cookie Cups are a delightful treat that everyone will love! These little desserts feature a sweet sugar cookie base filled with creamy buttercream frosting, making them perfect for any occasion from birthdays to holidays. Their bite-sized shape and customizable toppings make them not only adorable but also fun to share. Plus, they’re easy to make and sure to impress your guests!
Why You’ll Love This Recipe
- Easy to Make: With simple steps and common ingredients, these cookie cups come together quickly.
- Customizable Toppings: You can decorate with different sprinkles or food coloring to suit any theme or holiday.
- Perfect for Sharing: These cookie cups are the ideal size for parties or gatherings, allowing everyone to enjoy a sweet treat.
- Delicious Flavor: The combination of sugar cookies and cream cheese buttercream creates a tasty dessert that’s hard to resist.
- Kid-Friendly Fun: Get the kids involved in decorating these cookie cups; it’s a fun activity that everyone will enjoy.
Tools and Preparation
To create your Sugar Cookie Cups, you’ll need some essential tools in your kitchen. Having the right equipment ensures that your baking process goes smoothly.
Essential Tools and Equipment
- Muffin pan
- Electric mixer (handheld or stand)
- Rubber spatula
- Mixing bowls
Importance of Each Tool
- Muffin pan: This is crucial for shaping the cookie cups perfectly. It gives them their unique form.
- Electric mixer: Helps achieve a fluffy buttercream frosting quickly and effortlessly, saving you time and energy.
- Rubber spatula: Ideal for scraping down the sides of bowls, ensuring all ingredients are well mixed.
- Mixing bowls: Having multiple sizes allows for efficient preparation of both the cookie dough and frosting.

Ingredients
Sugar Cookie Cups require simple ingredients that you may already have in your pantry.
For the Cookie Base
- 3/4 cup salted butter (softened)
- 3/4 cup granulated sugar
- 1 large egg
- 1 1/2 teaspoons vanilla extract
- 1/2 teaspoon almond extract
- 2 cups all-purpose flour
- 1 teaspoon baking powder
- 1/2 teaspoon baking soda
For the Buttercream Frosting
- 2 ounces cream cheese (softened)
- 3 cups powdered sugar
- 1/4 cup butter
- 2 tablespoons milk
- 1/4 teaspoon vanilla extract
- pink or red food coloring gel (optional)
How to Make Sugar Cookie Cups
Step 1: Preheat the Oven
Preheat your oven to 350 degrees F. Grease two regular muffin pans with nonstick cooking spray to prevent sticking.
Step 2: Cream Butter and Sugar
In a large bowl using an electric mixer, cream together the softened butter and granulated sugar until light and fluffy. This should take about 3-5 minutes. Don’t forget to scrape down the sides of the bowl with a rubber spatula.
Step 3: Add Egg and Extracts
Add in one large egg along with the vanilla and almond extracts. Beat until smooth.
Step 4: Combine Dry Ingredients
In a medium bowl, whisk together the all-purpose flour, baking powder, and baking soda until well mixed.
Step 5: Mix Wet and Dry Ingredients
Gradually add the dry flour mixture into the wet mixture. Mix until just combined; do not over-mix as this can affect texture.
Step 6: Shape Cookie Cups
Press about two tablespoons of dough into each muffin cup, pressing it halfway up the sides.
Step 7: Bake
Bake your cookie cups for approximately 12 minutes. Once done, let them cool in the pan for at least 15 minutes. Use a rounded tablespoon or spice jar lid to press down in the center, creating a cup shape. Allow them to cool completely in the pan.
Step 8: Make Buttercream Frosting
While cooling, prepare the frosting by beating together softened cream cheese and butter in a medium bowl until smooth using an electric mixer. Gradually add powdered sugar, vanilla extract, and milk while mixing until desired consistency is achieved. If too thick, add more milk; if too thin, add more powdered sugar.
Step 9: Decorate Your Cookie Cups
Transfer frosting into a piping bag fitted with a star tip or use a spoon to fill each cooled cookie cup. Top with sprinkles if desired. Enjoy your delicious Sugar Cookie Cups!
Servings: 19 cookie cups
Prep Time: 15 minutes
Cook Time: 12 minutes
Total Time: 45 minutes
Course: Dessert
Cuisine: American
How to Serve Sugar Cookie Cups
Sugar Cookie Cups are versatile and can be served in various delightful ways. Whether it’s a festive gathering or a casual family dessert night, these cookie cups can be customized to fit the occasion.
For Celebrations
- Themed Sprinkles: Use sprinkles that match the occasion, such as red and pink for Valentine’s Day or pastel colors for Easter.
- Mini Dessert Platter: Arrange several cookie cups on a platter alongside other mini desserts for a beautiful presentation.
With Beverages
- Milk Pairing: Serve with cold milk to balance the sweetness of the frosting.
- Coffee or Tea: Offer alongside a warm cup of coffee or herbal tea for a cozy dessert experience.
For Kids’ Parties
- Decorate Together: Let kids add their favorite toppings, like extra sprinkles or chocolate chips, making it a fun activity.
- Colorful Frosting: Use vibrant food coloring in the frosting to make them visually appealing for younger guests.
How to Perfect Sugar Cookie Cups
Perfecting Sugar Cookie Cups requires attention to detail and a bit of practice. Follow these tips to ensure your cookie cups turn out beautifully every time.
- Bold Butter Temperature: Ensure the butter is at room temperature before mixing for optimal creaminess.
- Bold Don’t Over-Mix: Mix until just combined to keep your cookie cups tender rather than tough.
- Bold Press Evenly: When pressing dough into the muffin pan, ensure an even thickness for consistent baking.
- Bold Allow Cooling Time: Let cookie cups cool completely before adding frosting to avoid melting it.
- Bold Experiment with Flavors: Try different extracts or add citrus zest to the dough for unique flavor variations.
Best Side Dishes for Sugar Cookie Cups
Pairing side dishes with Sugar Cookie Cups can enhance your dessert experience. Here are some delightful options:
- Bold Fresh Fruit Salad: A mix of seasonal fruits balances the sweetness of the cookie cups.
- Bold Yogurt Parfait: Layer Greek yogurt with berries and granola for a creamy contrast.
- Bold Whipped Cream: A dollop of homemade whipped cream adds extra richness without overpowering the cookies.
- Bold Chocolate Dipping Sauce: Serve warm chocolate sauce on the side for dipping, offering a decadent touch.
- Bold Ice Cream: Vanilla or fruit-flavored ice cream complements the sweetness and provides a refreshing bite.
- Bold Nut Mixes: A bowl of mixed nuts adds crunch and balances flavors with its savory profile.
Common Mistakes to Avoid
When making Sugar Cookie Cups, it’s essential to avoid common pitfalls that can affect the final result. Here are some mistakes to watch out for:
-
Skipping ingredient measurements: Always measure your ingredients accurately. This ensures that your cookie cups have the right texture and flavor.
-
Over-mixing the dough: Mixing too much can lead to tough cookies. Mix just until combined for a tender cookie cup.
-
Not preheating the oven: Make sure your oven is fully preheated before baking. This helps the cookies rise properly and maintain their shape.
-
Ignoring cooling time: Allow your cookie cups to cool completely before adding frosting. Frosting warm cookies can lead to a melty mess rather than a beautiful presentation.
-
Using old or expired ingredients: Check your baking powder and baking soda for freshness. Expired ingredients can hinder your cookies from rising and achieving the right texture.
Storage & Reheating Instructions
Refrigerator Storage
- Store Sugar Cookie Cups in an airtight container.
- They will last up to 5 days in the refrigerator.
Freezing Sugar Cookie Cups
- Place cooled cookie cups in a single layer on a baking sheet.
- Freeze until solid, then transfer them to a freezer-safe bag for up to 3 months.
Reheating Sugar Cookie Cups
- Oven: Preheat your oven to 350°F and warm the cookie cups for about 5-7 minutes until soft.
- Microwave: Heat individual cookie cups for about 10-15 seconds until just warm.
- Stovetop: Use a skillet over low heat, placing the cookie cups covered for a few minutes until warmed through.
Frequently Asked Questions
Here are some frequently asked questions about Sugar Cookie Cups that may help you in your baking journey.
Can I customize the frosting for Sugar Cookie Cups?
Yes! You can add different flavors or colors to the frosting. Experiment with lemon zest or cocoa powder for unique variations!
How do I make these Sugar Cookie Cups gluten-free?
You can substitute all-purpose flour with a gluten-free blend. Ensure all other ingredients are gluten-free as well.
What can I use instead of cream cheese in frosting?
You can use mascarpone cheese or even Greek yogurt for a lighter option if you prefer not to use cream cheese in your frosting.
How should I store leftover Sugar Cookie Cups?
Store them in an airtight container at room temperature for up to 5 days, or refrigerate them if you prefer them chilled.
Can I use different extracts in my Sugar Cookie Cups?
Absolutely! Feel free to swap vanilla extract with lemon or coconut extract for distinct flavors in both the cookies and frosting.
Final Thoughts
Sugar Cookie Cups are not only delightful but also versatile, making them perfect for any occasion. You can easily customize these treats with different frostings, colors, and toppings. Whether you’re celebrating a holiday or just indulging yourself, these cookie cups are sure to impress! Try this recipe today and let your creativity shine!
Sugar Cookie Cups

Sugar Cookie Cups are a delightful fusion of sweet sugar cookies and creamy buttercream frosting, perfect for any gathering—from birthdays to holidays. These bite-sized treats are not only adorable but also versatile, allowing you to customize toppings to match different themes. With their easy preparation and kid-friendly appeal, they are sure to impress at your next celebration. Enjoy the fun of decorating and sharing these charming desserts that bring joy in every bite!
- Prep Time: 15 minutes
- Cook Time: 12 minutes
- Total Time: 27 minutes
- Yield: Approximately 19 cookie cups 1x
- Category: Dessert
- Method: Baking
- Cuisine: American
Ingredients
- 3/4 cup salted butter (softened)
- 3/4 cup granulated sugar
- 1 large egg
- 1 1/2 teaspoons vanilla extract
- 1/2 teaspoon almond extract
- 2 cups all-purpose flour
- 1 teaspoon baking powder
- 1/2 teaspoon baking soda
- 2 ounces cream cheese (softened)
- 3 cups powdered sugar
- 1/4 cup butter (softened)
- 2 tablespoons milk
- 1/4 teaspoon vanilla extract
Instructions
- Preheat your oven to 350°F and grease two muffin pans.
- In a bowl, cream together softened butter and sugar until fluffy (about 3-5 minutes).
- Add the egg, vanilla, and almond extracts; mix until smooth.
- In another bowl, whisk together flour, baking powder, and baking soda.
- Gradually combine the dry ingredients with the wet mixture until just blended.
- Press about two tablespoons of dough into each muffin cup, shaping it up the sides.
- Bake for approximately 12 minutes; cool for at least 15 minutes before shaping cups with a rounded spoon.
- For frosting, beat cream cheese and butter until smooth, then add powdered sugar, milk, and vanilla until desired consistency is achieved.
- Frost cooled cookie cups and decorate as desired.
Nutrition
- Serving Size: 1 cookie cup (38g)
- Calories: 146
- Sugar: 10g
- Sodium: 99mg
- Fat: 6g
- Saturated Fat: 3g
- Unsaturated Fat: 2g
- Trans Fat: 0g
- Carbohydrates: 21g
- Fiber: <1g
- Protein: <1g
- Cholesterol: 17mg